

Webflow is a web-based drag and drop web design tool that was introduced in 2012. It has been gaining popularity over the years, but it also comes with its own limitations.
Webflow is a website builder that provides you with the ability to create responsive and professional websites without any coding.
It’s an excellent tool for beginners, but it has some major limitations.
Webflow’s limitations are mainly because it’s a closed-source system.
As closed-source software, the stuff you can do with Webflow is bound by the native Webflow features.
But, the stuff you can do in Webflow can be expanded using custom code and third-party integrations.
In this article, you will find out about 6 major Webflow limitations and their respective solutions for you to overcome them.
Limitation 1: Comment Feature:
There is no native comment feature inside of Webflow.
For example, if you want people to post comments on your blog post, there is no way to do not with just Webflow. You need to integrate a third-party integration.
Solution:
There are a few different ways to get around this.
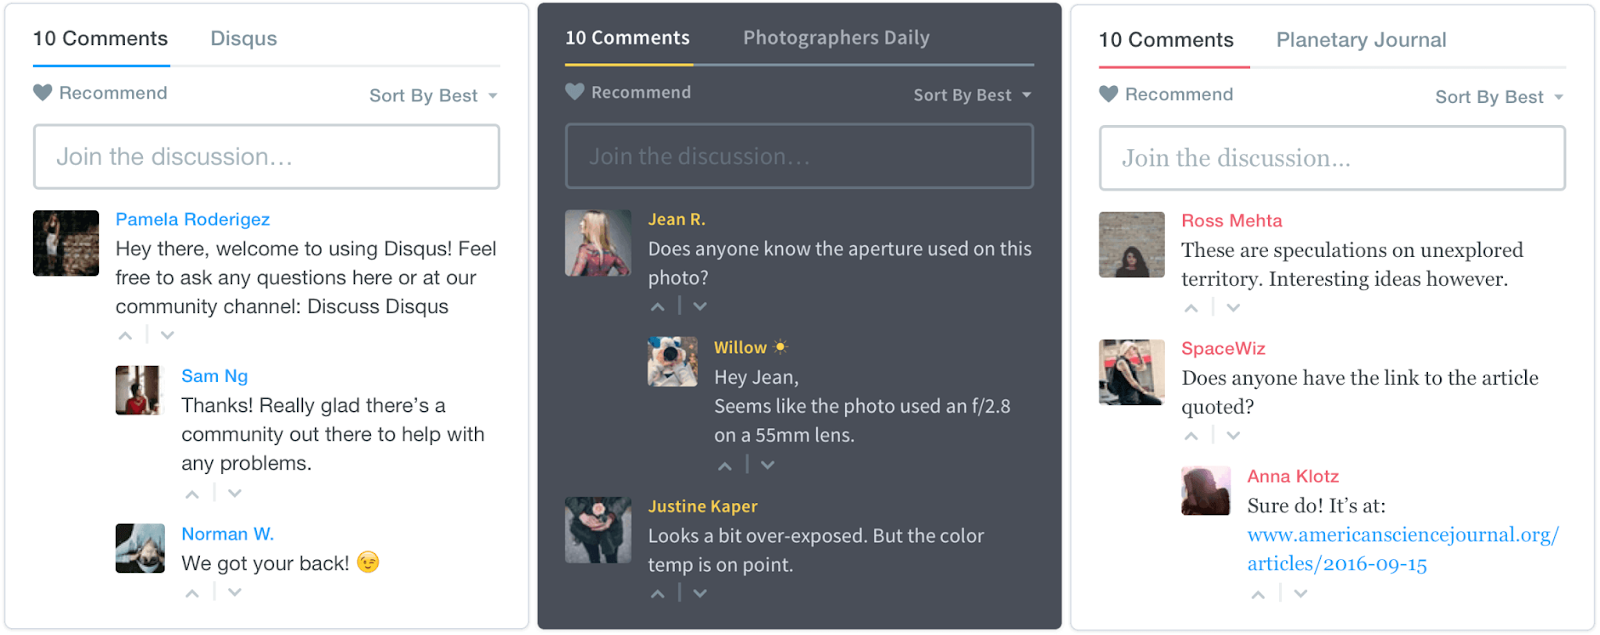
One way is to use Disqus, which is a popular commenting system that can be integrated into Webflow.
Disqus is a global comment system that helps you to increase discussion on your website. It is the commenting platform used by millions of people around the world, and it’s the best way to manage comments on your website.
Disqus is a third-party commenting plugin that can be installed on any sort of website or blog, with the option to use either the Disqus Add-ons and plugins.
You can also customize and tweak Disqus for your website with extensive APIs and JavaScript hooks.
Here is how to setup Disqus for your webflow website:
1. Open your Disqus account
2. Choose "I want to install Disqus on my site"
3. Enter the name of your website, and choose a preferred category
4. Choose a Plan (Basic is Free).
5. Scroll down on "Install Universal Code Manually".
6. Copy all the code you see from the 1st box.
7. Paste the copied code from Disqus in an "Embed code" widget on your website, in the desired location.
8. Go back to Disqus, press "Configure" at the bottom of the page
9. Configure your Disqus widget as you like, insert your website address
10. Click "Complete Setup"
11. Click "Configure your site's community settings" for more options
12. Publish your site.
You can also connect disqus comment section to your webflow website with help of zapier.
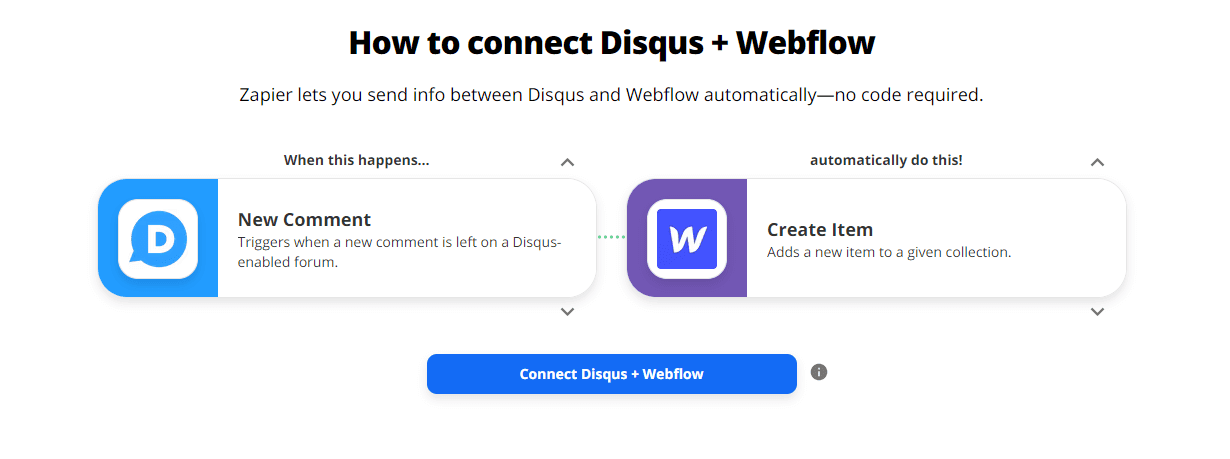
Zapier is a web automation tool that lets you connect different web applications.
With Zapier, you can create workflows between web applications to automate tasks.
Zapier lets you send info between Disqus and Webflow automatically—no code required.
This is how you can connect disqus to webflow via zapier:-
First, you need to create a Disqus account and configure it as described in the previous steps.
Second, you need to create a Zapier account and connect it to your Disqus account.
Third, you need to find the webhook URL for your Disqus account.
To find the webhook URL, open your Disqus account and go to Settings > Comments > Webhooks.
The webhook URL will be in the form of:
Fourth, you need to create a Zapier workflow.
To do this, go to Zapier and choose Make a Zap! > Connect Disqus.
Select the Disqus account you want to use and click Connect.
Next, select the Trigger App and choose New Comment.
Click Save + Continue.
Now you need to configure the Action App.
Select Webflow and choose Create and Item.
Enter your details, and click Save + Continue.
Finalize your Zap by giving it a name and turning it on.
Now every time a new comment is made on your Disqus account, a new webflow item will be created.
Another option is to use Facebook comments. This will allow people to comment on your web pages using their Facebook account.
Here is how you can add Facebook Comments to your webflow website:-
First, create a Facebook App.
To do this, go to Facebook for Developers and click "Create a New App".
Enter the App Name, Category, and Privacy Policy.
Click Continue.
On the next page, you will be asked to choose a Platform.
Choose Website and click Continue.
Second, you need to add the webflow Facebook integration.
To do this, open your webflow website and go to Settings > Integrations.
Click the Facebook logo and enter the App ID and Secret you created in the previous step.
Then click on save and continue.
Another great option is to use the facebook comment widget by elfsight. It's a great tool to add facebook comments on your website for a small fee.
Limitation 2: Dynamic Filtering Systems:
Webflow’s dynamic filtering systems are not as powerful as they could be. If you want to create a more complex filtering system, you will need to use custom code or third-party integrations.
If you want to make a complex filtering system with dynamic CMS items, for example, a property listing page, you cannot do that with only Webflow. Again, you need to add some custom code to make this work.
Solution:
There are a few different ways to get around this limitation. One of the best ways is to use Jetboost.io complex filtering without complex code.
Jetboost is the simplest way to add dynamic filtering to your Webflow sites with absolutely no Javascript knowledge required.
This will allow you to create more complex filtering systems using web flow. Another option is to use the Filters plugin from Webflow’s marketplace.
Yes, You can add custom code to your web flow site, but you might end up spending hours, if not days, trying to format and debug the Javascript code just to get it working on your site.
Jetboost works with any Webflow site, regardless of how you’ve designed it.
This plugin provides some additional filtering functionality that can be used in your web flow pages.
Enhance your site's functionality and make it more appealing with a dynamic filtering system from Jetboost.
Here's how to setup Jetboost for your webflow website:
- Remove the Multi Filters + Search from the Combine Filters folder and make it the new home page.
- Delete all other pages from each folder until you are left with just "Home" and "meta".
- Style your home page. Add in your header, footer and branding and style according to your choice. Add in links to the header for all products, linked to the home page, login button and sign up button, both unlinked for now.
- Remove the text from the right Multi Filters + Search, and edit to contain sign up information and button, unlinked for now.
- Adjust any remaining styling preferences and move on to the next tutorial video, where you'll make a duplicate for the Member Only home page.
Limitation 3: User Dashboard/Login:-
At the moment, Webflow does not offer a login/dashboard feature. For example, if you want to allow users to create a login to access exclusive content, you cannot do that using only Webflow. Again, you need to use a third-party integration/software to do this.
Solution:
There are a few ways to get around the User Dashboard and Login Limitations.
One way is to use Memberstack.
Memberstack is a SaaS product that helps businesses create secure user accounts and payments in a fraction of the time.
Here's how to get your memberstack setup for your website:
After you've finished creating your website, the next step is to create a membership on the Memberstack dashboard.
From the dashboard, go to Create Membership -> Choose free or paid.
The next thing you do is to enable hiding of content — for our demo that is the page with the URL slug 'members' (see this video for more info).
After you've completed the registration process, you'll be taken to our members page. Save the file.
Fill in First Name and Member ID as sign up fields in Forms & Fields. Be sure to toggle on 'Hide from the profile' for the Member ID.
Select Power-ups, and then from the drop-down choose Power-ups again. Scroll down to the Security section and find Member-specific pages. Toggle it on, and open the drop-down.
Under 'Hide a folder or CMS collection' add the slug "members/".
Now navigate to Members. If you don't have a test member, add a member manually now.
Select that member, copy the Member ID from just below the email address.
Paste Member ID into the 'Member ID field' under Profile Info, and to the URL of the Member page, and hit close.
Your member dashboard in Webflow is now linked in Memberstack.
The Member ID will need to be manually or automatically entered for each member in both Memberstack and Webflow in the Members Collection list to link the dashboard.
There are other great membership integration tools on webflow like:
- Magic: It lets you build apps with blazing-fast, customizable, passwordless login - with future-proof crypto and identity tech under the hood.
- Pico: is the most customizable way to sell content and experiences. Convert traffic into leads with pre-built forms, landing pages, and popups. Sell premium content and newsletters with article paywalls, content gating, memberships, and more.
- Cotter: Lets you authenticate your users and get them to a target page that you want using magic links.
- Outseta: Turn your Webflow website into a subscription or membership business. Outseta is great for SaaS websites.
- Memberful: It is a Professional membership software that works with your website.
Limitation 4: 10,000 CMS Items Limit:-
Currently, Webflow only allows you to add a maximum of 10,000 records/items in your CMS database. For example, 10,000 projects in a portfolio.
10,000 items may sound a lot, but it’s extremely limiting even for small/medium blogs with many contributors, especially if you want to implement custom tags. As it is now, no blog/news site will be able to handle more than a few years of article creations before being forced off Webflow.
Solution:
Webflow uses its own CMS, exclusively.
You cannot integrate any external database code into a Webflow project, for now.
However, they built an API so if you want to manage your data using MongoDB somewhere else, you can read and write to the CMS using api.webflow.com
MongoDB is a database that uses a document-oriented structure. This allows for data models that better represent the objects in your application. For example, a blog with tags and categories can use MongoDB to store both the tag and category documents together as one object.
That means that it doesn't have the same structure as a traditional database (like MySQL).
In Webflow, you can use MongoDB to store your CMS data instead of the built-in CMS storage.
MongoDB allows you to have an unlimited number of records/items in your database. This makes it perfect for larger blogs/news sites with many contributors.
Limitation 5: 100 Static Pages Limit:-
At the moment, Webflow has a limit of only having 100 static pages.
Static pages are pages you can create manually as opposed to Dynamic pages.
Webflow limits the number of static pages and collection pages on the Free Starter plan. The page limit for premium plans and Team plans or Webflow hosted sites is 100 static pages.
The limit exists to ensure optimal Designer performance.
You can try using CMS Collections pages for pages that use the same template and structure. This allows you to have up to 50 dynamic pages on a free Starter account.
Solution:
As of the time this article was published, there is no known solution.
Limitation 6: Nested CMS Collections:-
One of the top CMS webflow currently has is that you cannot have more than 1 nested Collection List on a single page.
This limitation makes it very difficult to create web pages that have multiple levels of hierarchy, like an e-commerce store category page.
Solution:
Conclusion
This article revealed 6 major limitations of webflow and their respective solutions.
Almost all limitations are purely native to Webflow and how they can be overcome using custom code, third-party integrations or clever workarounds.
Webflow are releasing more and more features and how soon most of the limitations of Webflow will be solved.
This is an important read for people that are looking to create a website or blog on webflow.
If you’d like to ask any questions about how to overcome these limitations, feel free to reach out to us :)
We offer Webflow web design services to help business owners increase conversions, sales and much more.
Get in touch with us today and we'll more than happily provide a free video site audit that explains the current state of your website as well as practical tips + resources to improve.
.webp)
.webp)
Let's talk about your next project.
From highly interactive websites, or micro-sites, to Figma > Webflow development projects, we’ve got you covered - our team of Webflow experts are here to help.


